Quilters Lead Pieceful Lives.
Showing posts with label 3D / Op Art. Show all posts

Wednesday, April 23, 2025

Refraction

I felt like it was time for another op-art project.....something that gives the illusion of movement...in the sense of falling or being pulled in.

So I started playing around with Excel to create such a design.

Let's begin with a square...some random size and thickness.

Next, put another square (same thickness) inside of that; evenly spaced on all 4 sides.
Since it is exactly centered within the larger square, both diagonal lines go through all 4 corners of each square (respectively), and through the middle. No movement or illusion there.

Now...what if you offset the inner square? Slide it, on the diagonal down toward the right, and you get this:

The original top left - bottom right diagonal line still goes through all 4 corners and the middle, but the other diagonal line has now been "refracted"! (Like looking at a straw in a glass of water.) Each half now only goes through two of the squares' corners. 

Good so far.

Then, what if we make the bottom and right sides of the squares a little thinner? Maybe this will accentuate the "shift":

Indeed! And the illusion begins to take shape.

Obviously, it will take more than two squares to really give the desired effect! But if you notice in these simple models, there really are already FOUR squares! Two black and two white. Black and white will give the most contrast, so that makes the most sense here. 

But how many squares will I need?

I decided to make my actual piece 36" x 36". Big enough to really demonstrate the illusion, but not ridiculously large.

I played with different "thicknesses" (widths) for the black and white strips, for each of the top-left and bottom-right sets of fabs. Finally ended up with the thicker blacks being 1.25" (finished), the thicker whites being 1", and the thinner strips being 0.75" and 0.5" respectively. Oh....and a 1"x1" center black square.

And this results in 20 strips (alternating white and black) out from the center in all 4 directions.

So how to build this?

Every quilter, at some point early in their "career" has made a quilt using the Log Cabin Block pattern.
To do so, you start with a central square, then add strips around it (clockwise or counter). Every 4 strips gives you a bigger square (here the first one is made of a (center), a, b, b, and the first c), which is your block. It may be 4", 6", 8" and so on. Here is how that looks:


Usually, a quilt is made up of a lot of these blocks.

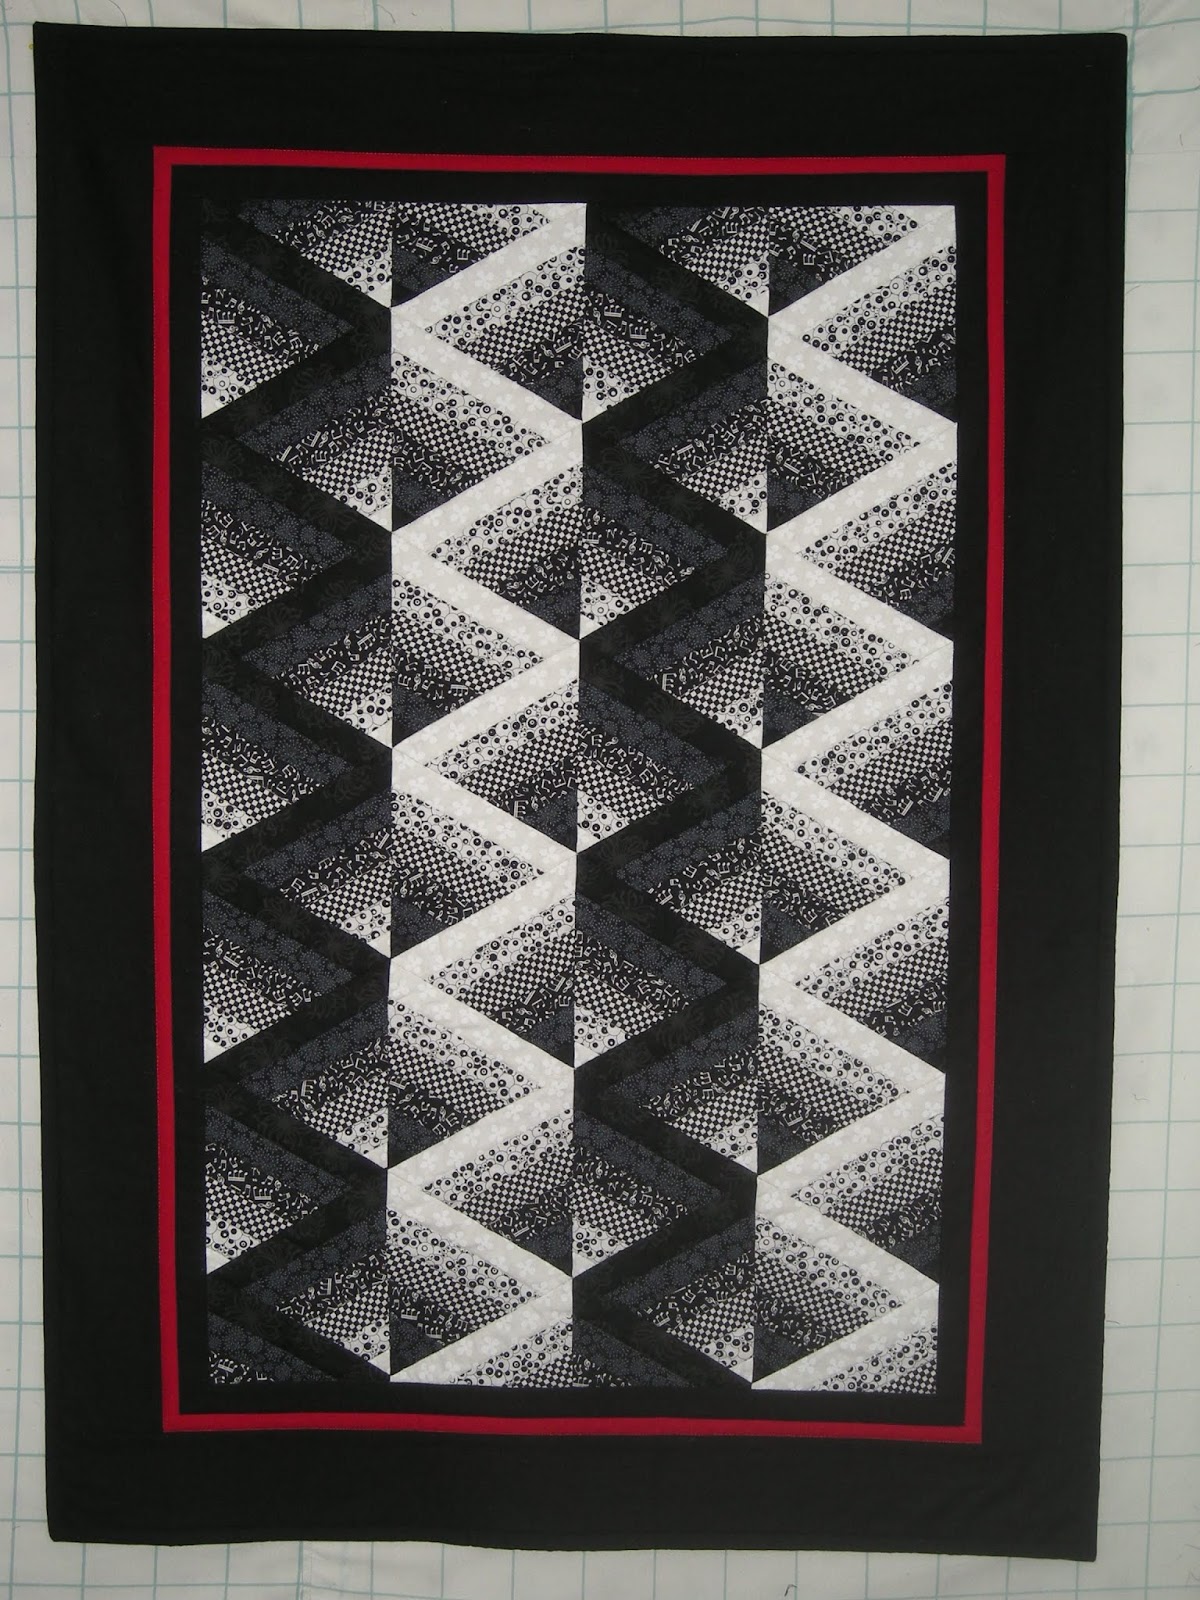
Here is a photo of the very first quilt I made (way back in 1995!) that shows how these blocks can be arranged:

You can see that each large block in this queen-size quilt is made from 4 smaller Log Cabin blocks. And each of those is half browns and half blues. There are so many ways to use this kind of block!

But I quickly realized that, by using this technique, I would really end up with ONE GIGANTIC LOG CABIN BLOCK!  What could be easier?  Just start in the center and keep adding on strip after strip after strip. The only real challenge was making sure that I used the right width for each black and white strip (only messed up once; had to rip two strips off and redo them). Note that the black fabric is solid (monotone), but the white is actually white dots on white.....this adds to the mind-bending illusion.

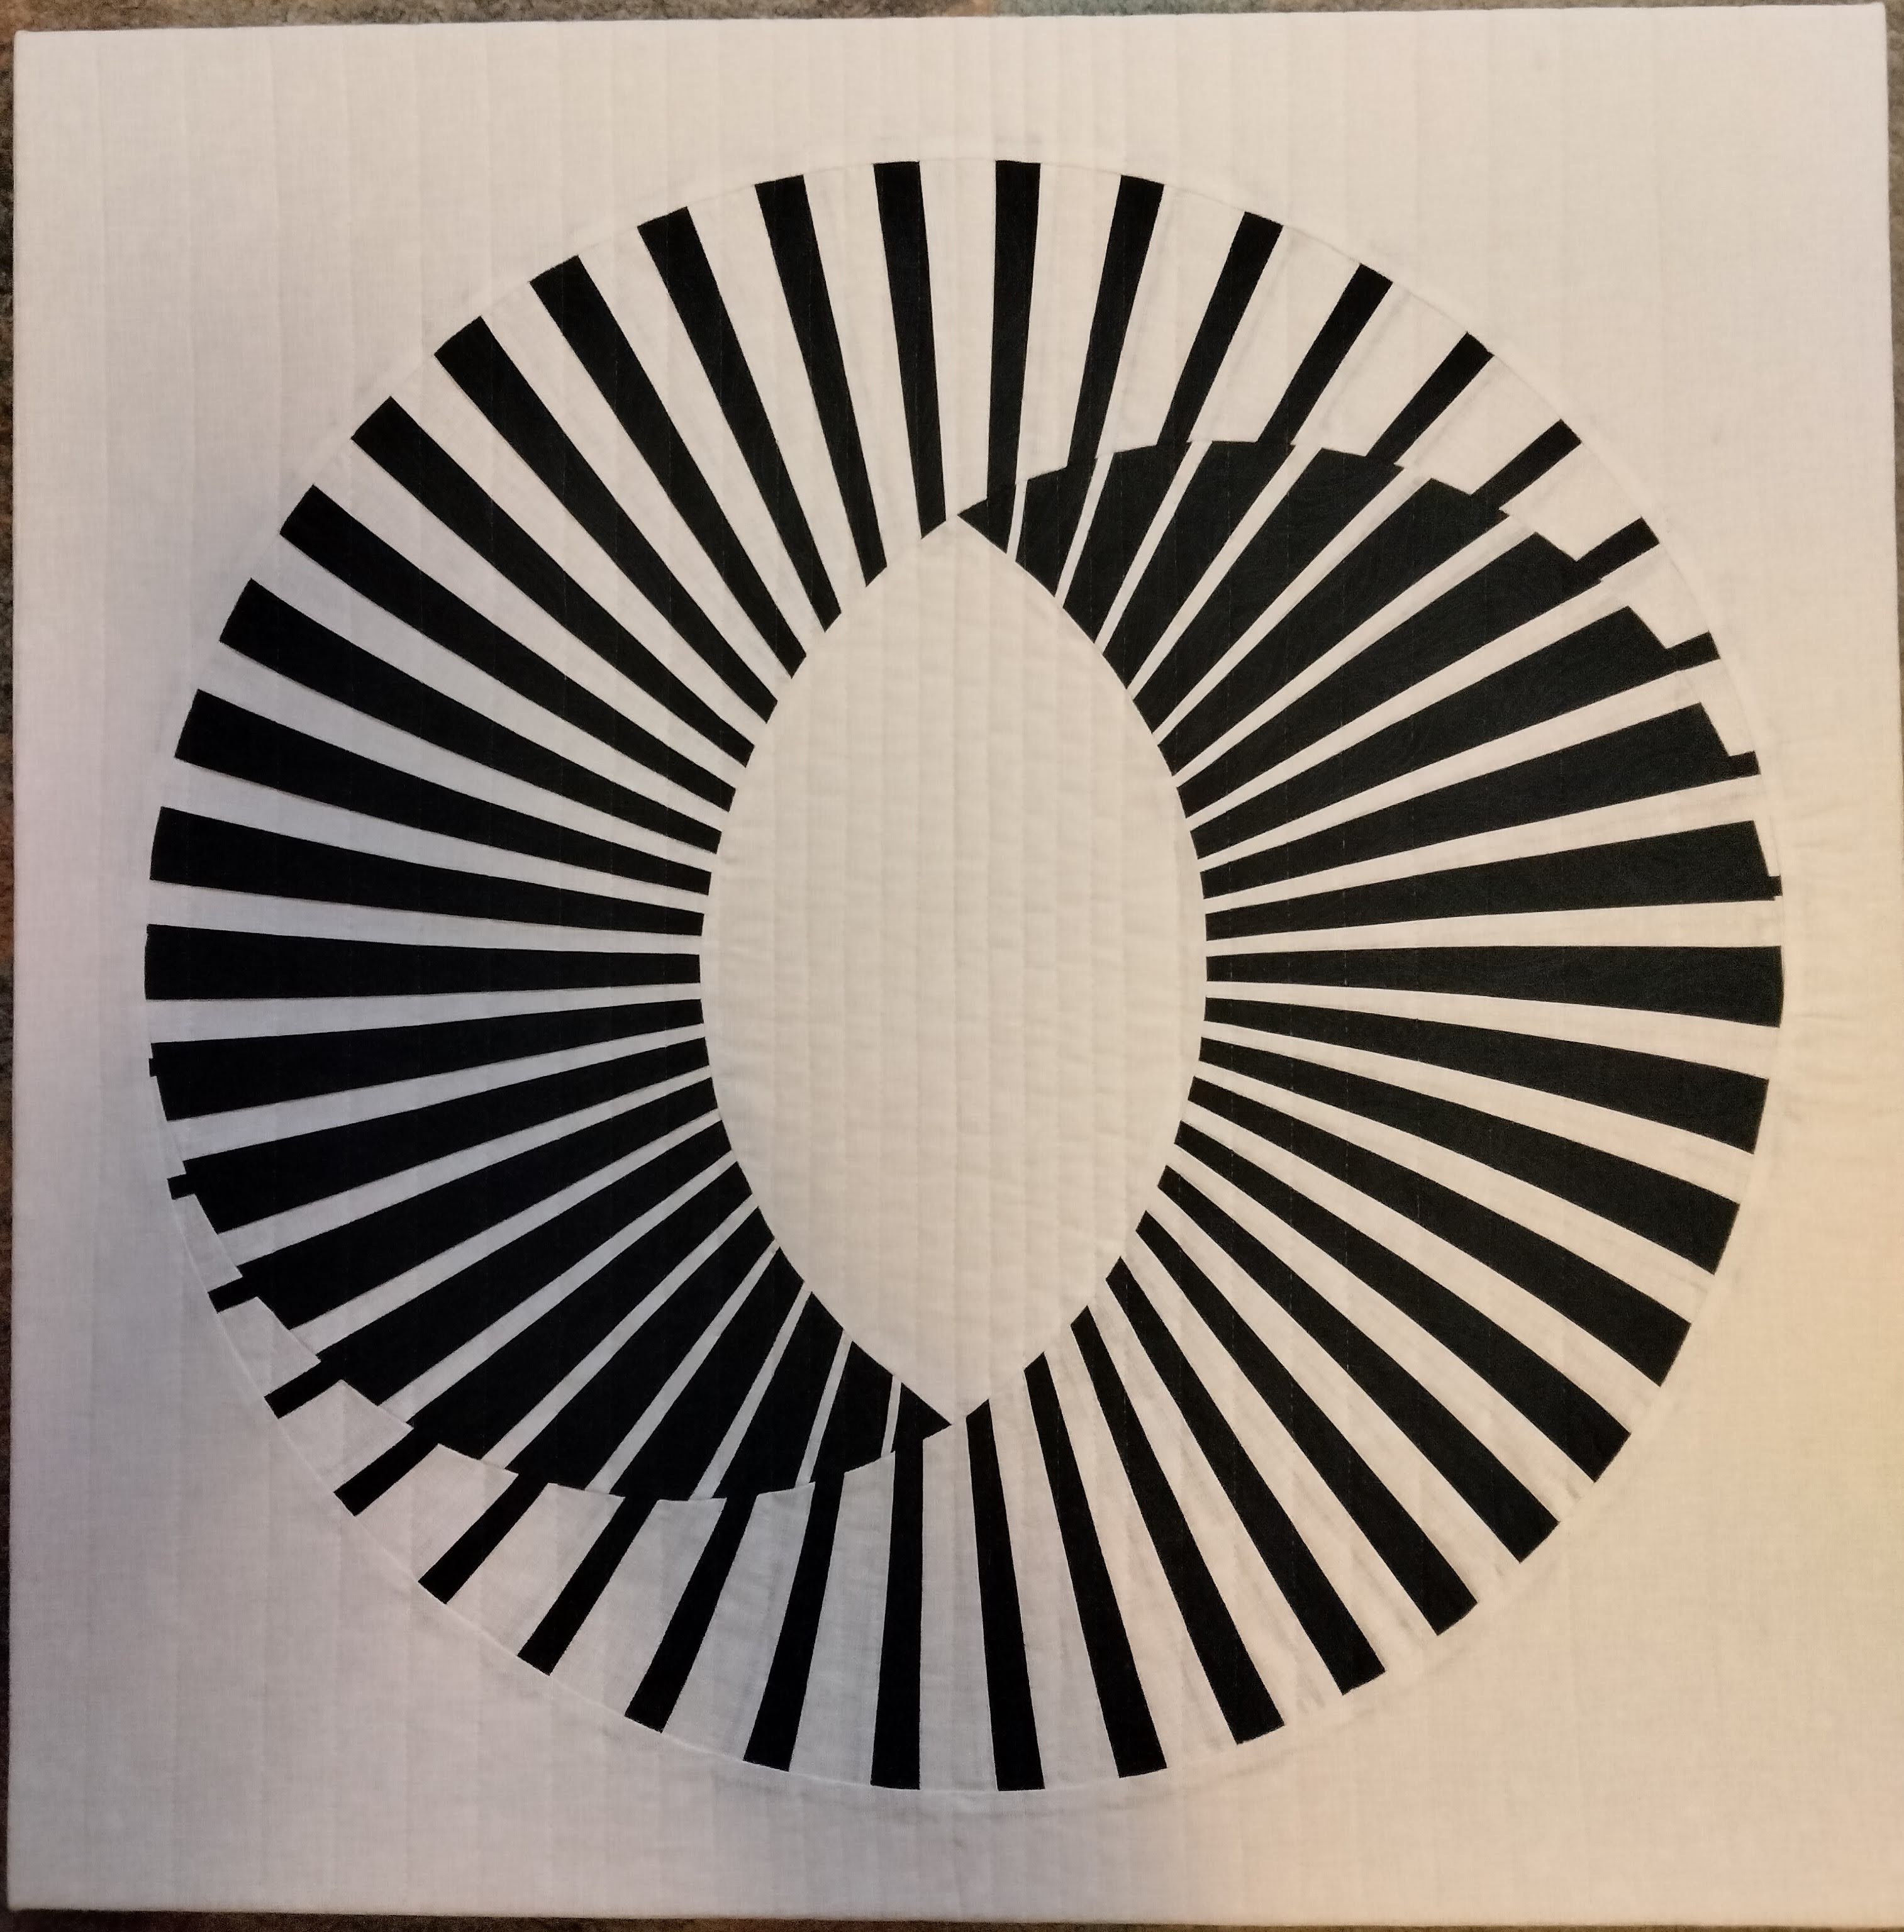
Here is the finished piece:


The illusion becomes more apparent if you stand farther back, but I get dizzy just looking at it from any distance!

I did minimal quilting: just black thread in the ditch of each black strip. Then, I mounted it on stretcher bars and it's ready to hang.

**This piece is for sale. Send me an email if you are interested.

Monday, March 6, 2023

Moby Quilt

Paper piecing!  Curves!   3D - Op Art!

What could be better!

This excellent pattern from Audrey Esary was actually pretty easy to do. 


Each black and white strip is cut oversized, sewn into place, and then trimmed.  You basically do two mirror-image sets of the same half-spiral. Then they are joined around the central "eye", with just a little bit of partial-seam finagling. 

The only really "tricky" part was then getting the center circle "embedded" into the outer border. YES! That is one solid piece of fabric with a center hole cut out. I had to flip the pieced center and work backwards and around the border, easing into the curves. It actually worked!!!

For the quilting, I did not want to detract from the visual impact of the mobius itself, so I did parallel vertical lines using clear mono-filament thread. But to reinforce / echo the expanding bands in the mobius design, I gradually increased the distance between the stitched lines, going from .5" at the central section to 1.25" at the edges.

The finished piece (26" x 26") was then mounted on stretcher bars. 

Sunday, January 5, 2020

All Different, Yet All The Same


This quilt took longer (6 months from design to completion) and more time (almost 200 hours) than any other one I have made in a long, long time.  About half of that time was spent in the designing, cutting, and laying out phase (with several major revisions along the way).

 
The inspiration for this wall hanging started with a photo I saw on Pinterest. The idea was to use many same-sized pieces, but to give the effect of the 3D cube by arranging them in a particular way. Each of the colored rectangles is 1" x 1.5". So this is not a true "postage stamp" quilt, where all the pieces are square. But at 1,086 pieces, it does have a similar look.

The background "strips" are made of a variety of blue, gray, green, brown, and red pieces (about 50 different fabrics), alternating with white. The same fabric does not repeat in any given row! Those five colors repeat in groups going across. They are then offset by one in each following row.  So looking down the piece you'll see the same blue, gray, green, brown, and red pattern repeated.

The "cube" is made by arranging the purple fabrics (about 20 different ones) in such a way that there appears to be 3 sides. It is all done by having more or fewer purples (and whites) on a given "side". Though these fabrics are randomly arranged, again, the same fabric does not repeat within a row. And it is off-center to add a little extra interest.

As to the title: It has two meanings.
First, the literal one. As noted above, there are many different fabrics in this quilt. Each row is unique. Yet all the pieces in the background are the same size and shape.

Second, a more figurative meaning. This quilt was donated for auction to Hands of Peace at their Spring Benefit. This is an organization that brings together Israeli, Palestinian, and U/S/ teens each summer for two weeks of intensive dialog with the goal of raising the political, social, and self-awarenessof the participants, and ultimately to their involvement and leadership in achieving positive peace. So the title refers to the fact that all people are different, yet, at heart, we are all the same, and that we have more in common than we may realize.

As usual, I chose to do minimal quilting. It is all ditch quilting using clear monofilament thread.
The unusual thing I did this time was to finish it with a facing technique, rather than a traditional binding (A big shout out to my quilting buddy Donna for suggesting this approach).

In most quilts, there is a border. Then, you sew on a strip of fabric to finish the raw edges; that fabric may be the same as the border (so it blends in), a contrasting color, or a fabric used in the quilt top itself.

But this quilt has no border, and adding a thin contrasting binding fabric would unnecessarily draw the eyes away from the main focus of the piece: the cube. So Donna suggested the facing technique. I don't believe I have ever done this before! You basically start the same was as with a traditional binding: sew a small strip of fabric on each of the 4 sides (in this case I chose to use the same fabric as I used on the back). Then, instead of simply flipping rest of the strip over to the back, you actually flip it and roll the full 1/4" sewed part of the top piece with it! Doing this gives you the finished edge you need, but leaves no trace of the facing fabric on the front of the quilt! So the top pattern truly goes edge-to-edge!

Here is a view of the flipped and tacked facing piece on the back. You can also see the ditched quilting lines.  


It is said that "quilters lead pieceful lives".  Here's hoping that someone will bid on this quilt so that people in the Middle East can also lead peaceful lives.

Monday, June 5, 2017

Shadowland

Always a popular quilt pattern idea: floating squares making shadows.

What could I do to make it unique?

Play with the light intensity and angle!

So I designed this making the light the strongest / brightest at the center and getting weaker as you go out.

Thus, both the squares and their shadows reflect this: lightest in the center and darkest at the outer edges.

But if the light source was directly overhead (of the center), then wouldn't the shadows be on the opposite sides of where I placed them?

Probably, or maybe this exists in an alternate universe.....but it looked better in my design spreadsheet this way.


The background fabric had to be light, and lighter than the center square. Plain white was too boring, so I managed to find an off-white fabric with teeny-tiny white squares on it! These reinforce the whole square - shadow idea!

While cutting, I had to make sure that these teeny-tiny squares were straight across, and up and down.

This fabric was, of course, also used as the small corner pieces of each 'block". And since there are several sizes of blocks, the background pieces are not uniform, as say, regular sashing would be. The whole thing is a big jigsaw puzzle (in 4 quadrants) that had to be assembled from the center out.

The quilting is pretty bare bones: I used clear monofilament to ditch around all of the shadows, and also across some of the longer background seams.


For sale: 38" x 36"  Wall hanging  $125


Tuesday, October 13, 2015

Purple Prisms

A while back I saw this image on Pinterest:


You know how excited I get about op-art and 3D images, and turning them into quilts.  So this one was very intriguing.  After much digging, I determined that it was the work of Victor Vasarely, a major force in 20th century op-art.  You can read more about him and see other of his pieces by clicking here or here.  However, I could not find anything specifically about this piece! It is not on any of the Vasarely sites...I do not even know its title.  I tried contacting the Museo Vasarely en HungrĂ­a, but they never replied to my email.                                                                                                                                            
Looking at this piece, you can see that it is a variation on the standard tumbling blocks pattern. The main differences are a) some of the blocks are rectangles rather than squares (actually, the tumbling block "squares" are really hexagons!), and b) there are black filler pieces in between each "block". These fillers separate the blocks and add extra depth.

So...how to turn this into a quilt? Actually, the design was rather easy! I printed it, drew horizontal and vertical lines through all the vertices, and got a very well-defined grid. It was easy to transpose this grid, including the diagonals, into Excel and then use its tools to shade appropriately. To get the dimensions, I started with 1/2" x 1/2" as the size of the center square. That meant the intersecting middle row and column were also 1/2" wide.  From there I worked the dimensions until I got to the last row and column which are both 3" in size. This resulted in 37 columns and 31 rows, and a finished size of 43" x 58"!  Certainly a large work (no idea how big the original is), but I felt this size was necessary to create the depth required for the best effect.

Here is my finished piece:


I chose to use 4 shades of purple (plus black) rather than the blue of the original (although some of the shades look similar).

So the pattern, plus the judicious use of light, medium, and dark colors seems to pull the viewer into the center of a distant pit. You feel like you are falling inward.

On the other hand, if you look at the outer edges, they almost appear as a street view of apartment balconies and buildings.  Or are they prisms fracturing the light into various shades? (Hence the name: Purple Prisms.) But perhaps you see something else altogether.

Construction proved to be much more of a challenge than the design phase. This involved cutting and piecing many half-square triangle and half-rectangle triangle pieces. Half-squares are easy; it was the half-rectangles that gave me fits! For certain of the smaller finished dimensions you can not  follow the standard tutorial instructions. Why? Because the seam allowance is such a large part of the actual piece that you have to account for it when putting the two halves of the rectangle together. I am not exactly sure at what point this happens. If anyone is interested in solving this mystery I have a full write-up available and would love to hear from you!  Unfortunately, I did not realize this issue existed until I had finished several columns!  Hey!  The points aren't meeting up correctly! Rip...rip....rip...rip!!

One good aspect of the construction is this: when you make the half-square and half-rectangle pieces, you get 2-for-1!  That is, cutting, 2 black pieces and 2 purple pieces, then slicing, dicing, and sewing back together, results in 4 finished pieces! So, as I cut and pieced one column, the corresponding column on the other side of the center was simultaneously being built!  Made it seem like a faster process.

The other nice feature of this pattern is that every other column is made up of simple square or rectangular pieces. That is, the "halfsies" are in the even numbered columns and took a lot of time to do, while the even numbered columns are simple fabric pieces that went up quickly.

To quilt it, I used clear monofilament thread, and ditched it on both sides of the even numbered rows. You can see that the seams on these rows go uninterrupted from edge to edge, while the seams in the odd rows are broken up by some of the vertical solid blocks. The "wow" is in the pattern....why distract with any kind of noticeable quilting?

When the body was done, it was time for the border. Like many of my op-art pieces I wanted that extra POP!, so I figured a black border would be best. As I played with the fabric to see what size to make it, I was not satisfied. Since there are black pieces on all four edges, it looked like they were bleeding into the border. Hmmmm.....   I consulted with a quilting friend and she suggested no border at all! She felt that anything would present too much of a frame that would detract from the illusion. Perhaps Vasarely felt the same way as his op-art pieces all appear to be unframed!

As with some of my more recent pieces, I knew I wanted to mount this on stretcher bars. Having it just hang loosely from a sleeve would lessen the impact; it needs to be taut. So I still had to add fabric to allow the piece to be mounted. I sewed on 2" of black fabric to facilitate the wrapping around the frame. However, it is only seen from the sides, not on the front, so it is completely functional and not part of the finished work.

Note: The piece is mounted on the rectangular frame; the apparent curve in the photo above is just camera distortion.

And there you go.

To see more of this wonderful artist's work, go to Artsy.

One more treat:  to demonstrate how the piece actually came together, I created a slide show of photos after each two columns were added.  It's a pretty cool thing! If you have two more minutes, click on the link to see how it went: Construction Slideshow


Tuesday, March 10, 2015

Labyrinth

About a year ago I posted my Bulging Checkerboard quilt (Stand Back!), and got a lovely email about it from a quilter in Portland, Oregon named Margaret Ellis.   She also wanted to make that pattern, but in the same size as I did (51 x 51) vs the original 102 x 102 size of the pattern.

Since that time we have corresponded regularly and shared photos and ideas about a number of projects. And, yes....she did make the Checkerboard quilt too.

I have had a pattern in my queue for a long time, "Labyrinth Walk", (click for link to pattern). This pattern also makes a huge quilt: 84 x 84! Maybe it's just me, but this is waaaayyyy to big to put on a wall (unless you had a specific large, prominent space in mind), and I think the whole effect / impact would be lost if it was used as a bedspread. Why do these creators make these quilts so big?

I had been able to scale down the Checkerboard to one-fourth size, but for some reason was having trouble doing this one. Margaret reminded me of a fun math fact: halve the dimension and you get 1/4 the size! So she was kind enough to put together a complete set of cutting instructions at the new size of 45 x 45 and sent them to me in December (along with a picture of her version of Labyrinth). The reason it is not exactly a one-quarter scale is that the white strips in the original are cut to 1.25" wide. There is no way to scale those in half and still have room left for a 1/4" seam allowance on both sides. So she just made those 1", which still worked out fine.

I put these new instructions in my "stack of things to be done" because a) we were going away for a week at the end of the month, and b) I was working on another quilt. Then, just after the first of the year, I saw a Facebook posting for an Art Auction at Homer Plessy School in New Orleans. Loyal readers know that my daughter lives in Nola, and one of her good friends is on the board of this school. YES!  I will make Labyrinth as it is a perfect candidate for an auction. But the art piece submission deadline was March 15th! Suddenly, I had to get very busy working on this. Luckily, we have had a string of single-digit and below-zero temp days, and my wife had an out-of-town weekend conference, so I had plenty of time to work on making this quilt.

Here is my finished piece:

As in some other 3D quilts, the farther back you stand, the better the dimensionality.

And, like a lot of quilts, this looks so much harder to make than it actually is! The fabrics are white, light gray, dark gray, and black batiks. There are really just two different blocks and they are arranged in 3 x 3 rows: the "2 concentric squares" block (5 of those), and the "maze" block (4 of those). Each block is about 12" square. It's all in the design, cutting and piecing. The former block is made up of 30 pieces for each, while the latter needs 64!

The two gray borders on the right side and bottom, plus the diagonal black corners, reinforce the apparent depth of the body.

As usual, I did minimal quilting: white thread in the ditch of all the white strips, plus grays and black ditching along the border edges as necessary.

Let me know if you can find your way out of the maze!

Monday, July 15, 2013

STAND BACK!!

POW!


The name of this quilt refers to the "explosive" nature of the optical illusion, and also as a suggestion to the viewer to get the maximum effect.

Here is the illusion: ALL of the squares are actually square, and ALL of the lines are actually straight!  Yes!!!  Go ahead....take a ruler or whatever and match it up to any line on the photo. I'll wait...........SEE!!!!!!!!!!

This illusion is known as "The Bulging Checkerboard".  Here is a link which shows how the mind overrides what the eye is actually seeing. Watch what happens as the slider moves and the small squares disappear.   And here is another link showing this effect created using Legos!

One thing that I find very interesting is that the effect is way more evident in the photos than in the actual quilt (although, as I said, if you stand back a ways and squint it is readily visible). Can anyone out there explain why this is so?  Could it be that because the camera's image is smaller the effect is more pronounced?

This FREE pattern was created by Krista Zaleski.  Her version is a huge 102" square. The blocks are 6" x 6" finished. Since this really needs to be hung on a wall to get the full effect, I scaled mine down to one-quarter of hers. So it is 51" x 51" (3" blocks).  Even so, it still contains 1,275 pieces! The smallest ones are 1 3/8" x 5/8"! TINY!!!!  Each of the "diagonal" blocks is actually a modified 9-patch!  The horizontal and vertical axis squares are made of 7 pieces each.

I quilted it on a diagonal (black thread in the black squares; cream in the cream) to emphasize the bulge.

There is a hanging sleeve on the top of the back. I also put corner triangles on the back bottom so it can use a wooden dowel (or other similar oblect) to add a little weight and keep the quilt taut. All the better to promote the illusion.

And here's the good news: I am giving this quilt away for free* to one of my faithful readers!  Just email me your name by noon Central this Friday. I will put all the names in a 55-gallon drum and pull out one lucky winner.

*No legalese; just a disclaimer:  If you are not in the Chicago area and you are the winner, you will have to pay either:  a) postage for me to send it to you, or  b) airfare if you want me to hand deliver it. Your choice.

Update:  The drawing for the quilt was won by Mibby Novak, a fellow quilter and travel friend from Pennsylvania. Congratulations Mibby!!!!!

Monday, February 11, 2013

Hexadaisy


Another excellent 3D paper-pieced pattern from Piece By Number. The keys to making this pattern work are the alternating color bands and the precisely matching points. This was easily accomplished using the  pattern's instructions and templates.

For this piece I chose to use mottled Batik fabrics instead of the usual bright solid fabrics I've used on other 3D pieces. The light- and dark-colored strips give the illusion of interwoven 3D cubes.

The quilting was done using smoky transparent monofilament on top and black thread in the bobbin. I ditch-quilted just around the inner and outer edges of each of the 6 cubes.  Thus the quilting is almost invisible. Another example of using the quilting as a totally functional element of the piece.


For sale: 21" x 21"  wall hanging  $100

Friday, September 7, 2012

Karen's Kwilted Kubes

In May, many of my quilts were on display at the Deerfield Senior Center. My friend Karen saw my 3-D Color Study (from 2003) and asked me to make her a king-sized bedspread version. We worked together to come up with the design.

Of course, I was not able to use the same fabrics as I did 9 years ago, so I got some of them at  Quilter's Heaven in Northbrook and many others on-line from the Hingeley Road Quilt Shop in Minnesota.

First, since she wanted the cubes as the center medallion on a large expanse of black background, we increased the size of the original cubes by 1/3. As in the original 3-D quilt, each cube is made from triangles (and strips); 6 cubes, 6 rainbow colors (red, orange, yellow, green, blue, violet - sorry indigo), and 3 shades in each. So 18 total different fabrics. The center hexagon is made up of the 6 dark-shaded fabrics. Here is a snap of the finished section with those cubes.


I say "finished" because this quilt was actually created in 8 separate sections! There was no way that I was going to try to quilt a king-size project (the biggest in size that I have ever done) in one piece!  Nor was I going to send it out to get long-armed; the price would have been exorbitant. And, as my quilt friend Alice says: "Why would I pay someone to do my hobby!"  Indeed! So each section was pieced, sandwiched, and quilted individually. Then all were machine joined together. 

I have made bed-sized (twin and queen) projects before, and have, at times, done them in 2 or 3 sections. But nothing ever like this! To help, I took an on-line class from craftsy.com. This class, "Quilting Big Projects on a Small Machine", was taught very well by Ann Petersen. Based on what I learned, and the design of this particular quilt, it made sense to do it in 8 sections.

Back to the design: Karen had the brilliant idea to place the "border" so it would sit on the top edge of the spread! This really helped define and frame the top of the quilt.  The quasi-border is made from triangles of the same 18 fabrics, going through the ROY G B(I)V sequence all around. There is no top border, as that part is covered by the top sheet and pillows. The binding is made of 8" strips of the 6 dark fabrics, again repeating in the rainbow sequence.

The eight sections are: 1) center cube medallion, 2) top center (all black), 3) bottom center (black plus border), 4) left middle (black plus border), 5) left outer (all black), 6) right middle (black plus border),
7) right outer (all black), and 8) bottom (all black).  So there were still some big sections to quilt; but it was very manageable this way.  All of the quilting is free-motion stiple.

To see more pictures of the quilt process, click here and scroll down.


Above is the finished quilt flat on the floor (since the quilt is so large, it was difficult to get a good photo of it).
Below is the finished quilt on Karen's bed (the extraneous background objects were photoshopped out).

We were both really happy with the way it turned out.  Hope you like it too!

Wednesday, March 28, 2012

Antipodes


This pattern has been in my "want to do" queue for a while, and this seemed like a good time to do it.

The name "Antipodes" means "places diametrically opposite to each other on the globe." To me, this pattern has that same look. Indeed, by following the instructions in the pattern (from Toad-U-Sew Patterns), each pieced square is then re-cut and resewn so that it forms two oppositely-hued squares.

Does it look like a reflection? Or rain? Or a waterfall? What would you call it?

This beautiful quilt has found a home in Houston, Texas!

NOTE: This quilt, along with a number of my other quilts, will be on display during the month of May in the Patty Turner Senior Center in Deerfield. If you're in the neighborhood, stop in and see them in person!

Wednesday, May 11, 2011

Reflections (aka Visualize Whirled Peas)


Talk about pushing the envelope! This quilt goes in so many new directions (pun intended!).

First: the design. This particular pattern, and the 3D scrolls technique, come from "3-D Explosion...Simply FABULOUS Art Quilt Illusions" by Cara Gulati. In this book, Cara explains how to start with a simple "S" shape and add perspective lines to make a scroll. Adding and/or repeating scrolls builds the design. Appropriate use of colors and patterns (especially the stripes) enhances the 3D effect. Sharp-eyed readers will notice that the primary striped fabric is the same one I used in my previous quilt (the attic windows). All of the rest came from my stash!

Next: There is no piecing involved! That's right! Until I got to the quilting phase, I never went near my sewing machine. Cara builds her designs using a combination of freezer paper, glue stick, and machine applique using invisible thread. Since I really don't like to do applique, I took a slightly different approach.

Background: In March I visited the Visions Art Museum in San Diego. There I purchased the book "free expression...the art and confessions of a contemporary quilter" by Robbi Joy Elkow. For Robbi, it's all about the designs, the colors, and the quilting. She definitely does not like to sew hundreds of pieces together. Once she has the design, she cuts the distinct pieces to make templates (exactly like Cara does), but then she use fusible webbing to fuse the pieces together. No stitching! No applique! Then, heavy quilting. Her reasoning is that these pieces are meant to be hung, so there is no need to worry about the raw edges.

As I contemplated making one of Cara's quilts, I realized that I could use the fusing (and other techniques) from Robbi's book! So I was able to take the best of both approaches to create this quilt.

Now, most of you probably know that I consider quilting to be the least important design element of my quilts. It is almost entirely functional (to hold the quilt sandwich together), and I almost always use thread colors to match the fabrics so that the quilting is basically invisible. These 3D patterns are perfect for that mentality! Once again, here I followed Robbi's advice and quilted each piece in a way that mimicked the shape of that piece. So the quilting is both semi-invisible and highlights / reinforces the scrolls at the same time! And it is critical that the quilting go to the edges of the pieces (a faux applique!) so that they are tacked down thoroughly. Though I do a lot of free-motion quilting, as I was doing this piece, I felt for the first time that I was actually "painting" with the thread!

The final oddity: At the Visions Art Museum I saw a number of art quilts that were mounted on wooden stretcher bars (just as a painting on canvas would be). How perfect for this piece and any of Cara's 3D designs. These works are like canvases and the designs are meant to pop off the background. I am always a bit dismayed when my quilts do not hang straight and flat on the wall. The stretchers also solve this problem. And, since the piece is stretched around the bars, there is no need for a border nor a binding!

To see more pictures which go through the entire process of making this quilt, click here

Monday, February 1, 2010

3D Tucks #1

Although I have made many faux 3D quilts, this is actually the first real 3D quilt! That is, sandwiched between each vertical strip is another strip. This "tuck" strip has black fabric on one side and a second fabric on the other. The second fabric is cut from a piece of fabric which is dyed from purple to yellow and back again across its width.


After all of the strips and tucks have been sewn, the tucks are ironed against the seam line so that they pop out of the quilt body. A line of decorative stitching is added to hold them in place.


Looking at the quilt from either side gives different perspectives as the tucks and colors shift across the surface.

Thursday, June 18, 2009

3D Study in Black and White

Three strips of black patterned fabric and three of white alternate to create depth and movement in
this piece. The thin red border both frames and accentuates the black / white pattern.


Ditch quilted using black and white threads to emphasize the illusion on the back.


For sale: 32" x 45" Wall hanging  $150


Friday, July 6, 2007

Cubes, cubes, cubes!

Here are two of my 3D quilts, "Impossible Triangle" and "3D Color Study".

Careful use of color values and placement gives a three-dimensional look and feel to these quilts.

They look difficult (if not impossible!) to make, yet both are done with all straight line seams. The top one is made out of equilateral triangles sewn in slanted columns.  The bottom one is made the same way, with the addition of the thin strips at the "edges" of the boxes.


Monday, December 13, 2004

Boxing Match

Another quilt combining 3D cubes, lots of colors and shades, and the play of light and shadows.

The quilt is designed as if the light is pointing up from below the center. Thus, the middle of each cube has the lightest value.

The name of the piece is a pun: They are "boxes" and each pair "matches".  So: "Boxing Match"!


The quilting was done as free-motion, matching the color-value in each cube's face. Almost invisible from the front; very interesting on the back!


For sale: 31" x 23"  Wall hanging  $100