A little over a month ago, my mother-in-law Pauline requested another quilt for her apartment. She has a small wall in the bathroom over the towel bar that is vacant (heavens!), and asked if I could come up with something to put there. Bingo! Mosaic time! She wanted something bright, and it just popped into my head: van Gogh's Sunflowers! Here is Vincent's original:

Yup! That'll do.
So I did some Googling on "mosaic quilts" and eventually found an excellent how-to book: "Mosaic Picture Quilts", by Pat Durbin. The process is similar to making a watercolor quilt (like this one) or apostage stamp quilt (like this one) in that tiny squares (in this case 1 1/8") are used to make the picture, but that's where the similarity ends. Watercolor quilts are pieced (sewn) like most other quilt tops (and the focus is on color "value"). Postage stamp tops are sewn or fused and then sewn. Mosaics are simply fused.
For mosaics, first you put a transparent grid (also purchased from Pat Durbin) over the original picture. Like so:

Each of the squares should then be treated as if it were a pixel in a digital photograph.
You then draw squares (mine were 1") on a large piece of paper. In effect then, you scale up the original picture to the actual finished size of the quilt. You can then draw the picture, square by square, onto the large sheet, or just use the original + transparency as a guide as you go along. My objective was not to try to duplicate the picture exactly, but to make a reasonable facsimile out of fabric.
Next, a thin, non-fusible interfacing is placed over the large paper. This is the base that the squares will be fused onto. You want it to be thin enough that you can still see the grid squares (and/or drawn-in pattern) through it.
Now the fun part (well, the first fun part): I went through my stash to find appropriately colored scraps of fabric. I ended up with a whole bunch, but as I started the mosaic process, I realized that using batiks (or at least somewhat mottled fabrics) was a better approach than trying to make tiny pieces of different fabs blend together nicely.
Then, starting at one corner and working diagonally, I cut a square (lined with Steam-a-Seam Lite), and fused it into place. In some areas, as I went along, I sketched parts of the picture directly onto the interfacing. For those squares on the original that had multiple colors (say part of a petal and part of the blue background), I would cut and trim two (or more) fabrics) to approximate the "pattern" (pixel) in that same square of the orig-transparency. Besides being necessary to creating the facsimile, this adds some dimensionality to the piece.

The squares are 1 1/8", so that when they are fused onto the 1" grid there is a slight overlap (as you can see above). So this is a "mosaic" technique in the sense of building a picture with tiny pieces of material, but, of course, in tile mosaics, there is no overlap.

And here is the final result:
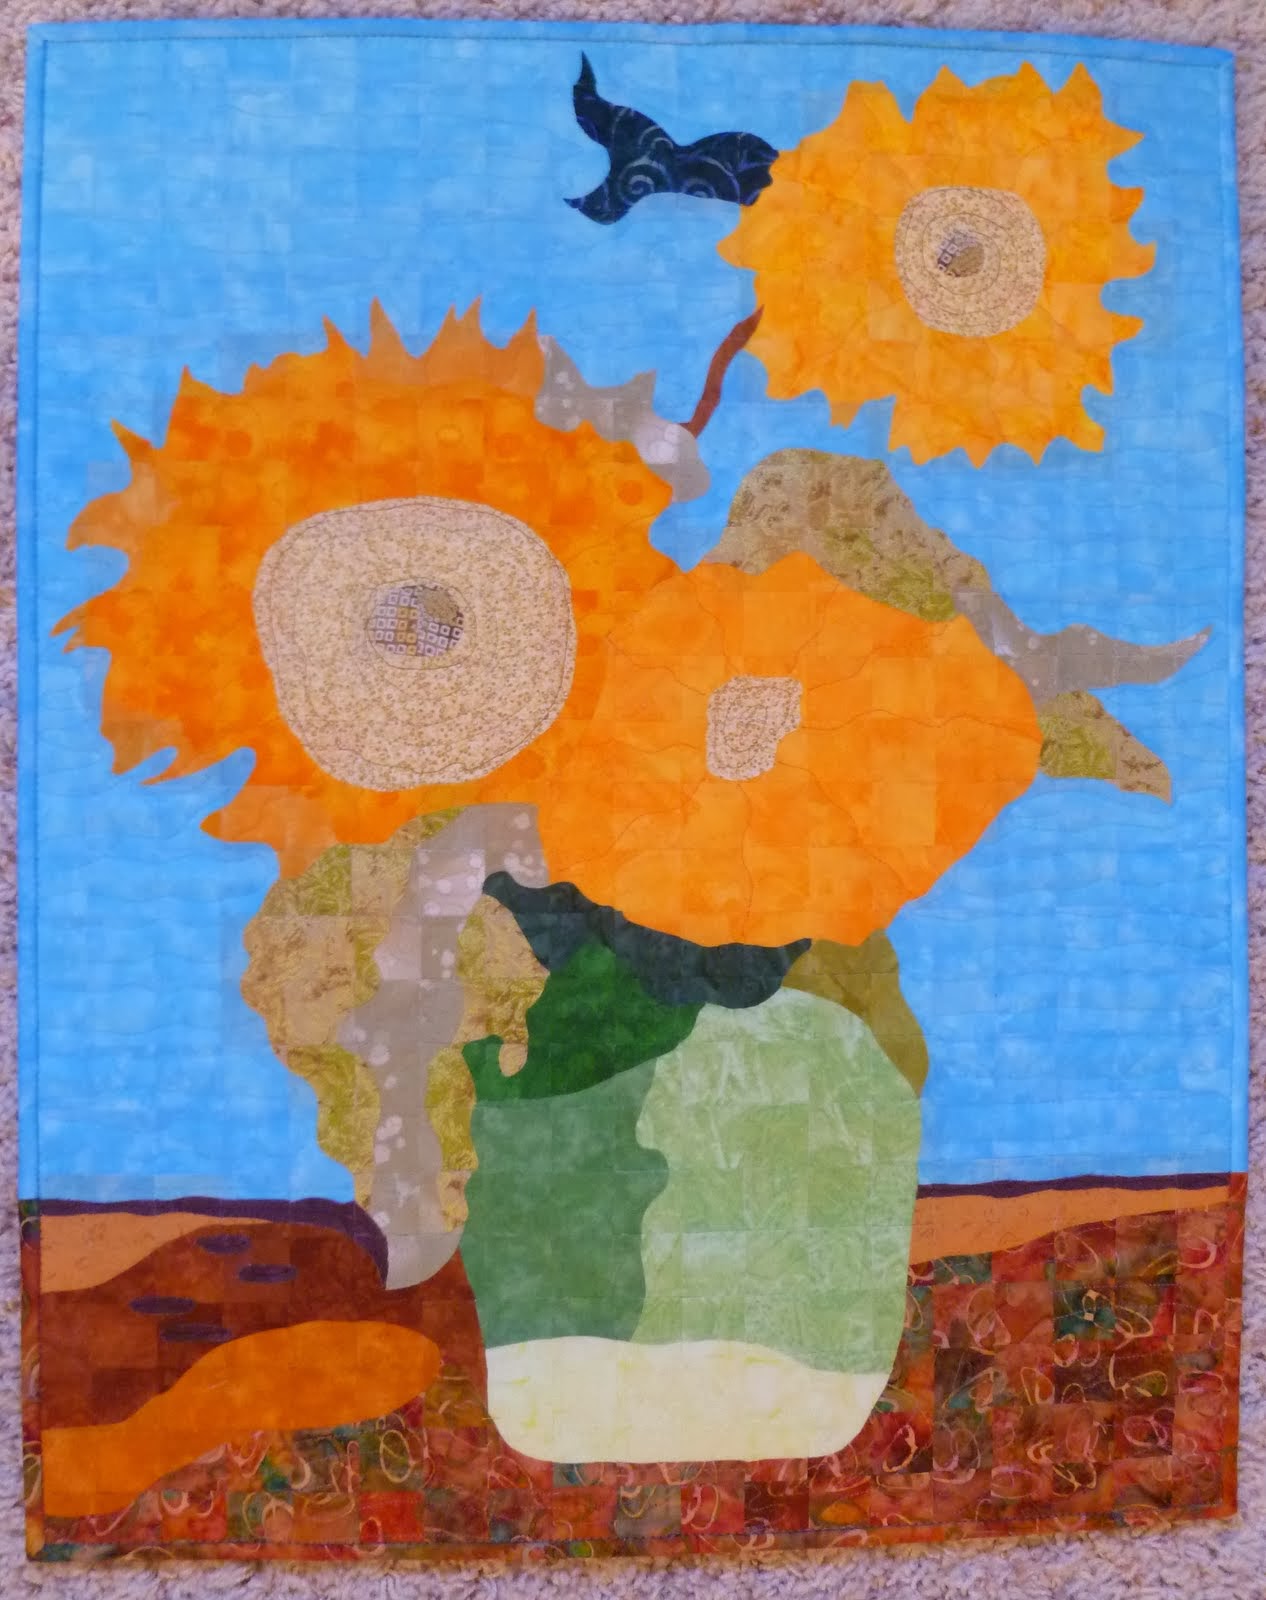
Since the piece has all of those fused squares (some with 4 layers of fabric!), plus the interfacing, it is pretty stiff. Of course, there is also the batting and backing fab. And since it is a small, wall-hanging piece, there was really no need for a lot of quilting (you can see the quilting better from this photo of
the back):

The vase is not quilted; this may make it physically stand out from the quilted areas, though not as much as in a normal (i.e., just pieced) quilt.
Because of the fusing, I didn't want to hold the layers together with safety pins as I normally do (holes in fused pieces do not "heal" when the pins are removed!). So I did something which is normally an anathema in quilting: I basted close to the outer edge on the bottom and 1/3 of the way up each side. This allowed me to keep the sandwich together without pins while I got the quilting going. After I quilted the "table" and a few inches of the background, I removed the basting and just held the rest together with a few thin straight pins parallel to the top (and right near the edge, where the holes would later be covered by the binding).
And speaking of the binding, I did something which I don't think I've done before (another challenge!): since this is supposed to look like a painting, I didn't want the narrow binding to appear as a "skinny frame". So, instead of making one long strip that would go all the way around (as is normally done), I made two strips. Each strip consisted of one part background blue fab and one part table bottom brown squiggles fab. I then sewed them on as usual, but had to join the raw ends at both the top and bottom. So the binding is integrated into the picture and is actually barely distinguishable.
And there it is. My first mosaic quilt!
When I gave it to Pauline, she insisted that it be hung in the living room, as it is "too nice to hide in the bathroom". So that's where it now resides.
For additional tips and information, see this post in my Quilt Tips blog.