Quilters Lead Pieceful Lives.

Monday, October 8, 2012

Stay Connected


So my mother-in-law found one more small space of wall in her apartment that did not already have a quilted piece on it, and asked my to make something "narrow and colorful".

This is the result.

I took the pattern for "Eternity Knot Block" by Piece By Number and stacked the blocks 1 x 3. Of course I used my favorite six rainbow colors (poor indigo loses out again!) on the black background. Quilted using stipling. 

Since the piece is rather small (10" x 30"), I was afraid it would not hang well, so for the second time (see Reflections [Visualize Whirled Peas]), I chose to mount this on wooden stretcher bars instead of using a regular sleeve. 

In order not to lose any of the pattern on the edges, I added 4" of "border" all around (before sandwiching and quilting of course!), but no binding.

So the finished piece is more like a painted canvas.

Now.....will she be able to find any more open space?

I hope so!

Friday, September 7, 2012

Karen's Kwilted Kubes

In May, many of my quilts were on display at the Deerfield Senior Center. My friend Karen saw my 3-D Color Study (from 2003) and asked me to make her a king-sized bedspread version. We worked together to come up with the design.

Of course, I was not able to use the same fabrics as I did 9 years ago, so I got some of them at  Quilter's Heaven in Northbrook and many others on-line from the Hingeley Road Quilt Shop in Minnesota.

First, since she wanted the cubes as the center medallion on a large expanse of black background, we increased the size of the original cubes by 1/3. As in the original 3-D quilt, each cube is made from triangles (and strips); 6 cubes, 6 rainbow colors (red, orange, yellow, green, blue, violet - sorry indigo), and 3 shades in each. So 18 total different fabrics. The center hexagon is made up of the 6 dark-shaded fabrics. Here is a snap of the finished section with those cubes.


I say "finished" because this quilt was actually created in 8 separate sections! There was no way that I was going to try to quilt a king-size project (the biggest in size that I have ever done) in one piece!  Nor was I going to send it out to get long-armed; the price would have been exorbitant. And, as my quilt friend Alice says: "Why would I pay someone to do my hobby!"  Indeed! So each section was pieced, sandwiched, and quilted individually. Then all were machine joined together. 

I have made bed-sized (twin and queen) projects before, and have, at times, done them in 2 or 3 sections. But nothing ever like this! To help, I took an on-line class from craftsy.com. This class, "Quilting Big Projects on a Small Machine", was taught very well by Ann Petersen. Based on what I learned, and the design of this particular quilt, it made sense to do it in 8 sections.

Back to the design: Karen had the brilliant idea to place the "border" so it would sit on the top edge of the spread! This really helped define and frame the top of the quilt.  The quasi-border is made from triangles of the same 18 fabrics, going through the ROY G B(I)V sequence all around. There is no top border, as that part is covered by the top sheet and pillows. The binding is made of 8" strips of the 6 dark fabrics, again repeating in the rainbow sequence.

The eight sections are: 1) center cube medallion, 2) top center (all black), 3) bottom center (black plus border), 4) left middle (black plus border), 5) left outer (all black), 6) right middle (black plus border),
7) right outer (all black), and 8) bottom (all black).  So there were still some big sections to quilt; but it was very manageable this way.  All of the quilting is free-motion stiple.

To see more pictures of the quilt process, click here and scroll down.


Above is the finished quilt flat on the floor (since the quilt is so large, it was difficult to get a good photo of it).
Below is the finished quilt on Karen's bed (the extraneous background objects were photoshopped out).

We were both really happy with the way it turned out.  Hope you like it too!

Saturday, July 7, 2012

Eliza's ABCs

Baby Eliza Page was born June 13th to Melanie and Ken (and joins big sister Avery). So earlier this year my daughter, Emily, and I decided to make an ABC quilt for her.  But it had to be special! So we found a very cute pattern (SarahBellumQuilts) that had a square for each letter. Each was traced from a pattern, fused to the white background fabric, and then I zig-zagged around each one with matching thread.

Each block has an adjoining sashing piece that also reflects the associated letter.

Then, we set out finding a fabric for each letter that featured an object beginning with that letter. "Apple" for "A", "Buttons" for "B", etc.  Some were easier than others. But....since the family lives in NOLA, we also wanted to find some fabrics with a local interest. Thus, for example, "Fleur de lis" for "F" and "Mardi Gras masks" for "M". "Q" was a little problematic, but we eventually found a "Question mark" fabric, and I made a miniature "Quilt" for the sashing. The hardest was "X". The only true X fabric we could find was one with "X-ray cats"! Seriously! X-rays of cats!!! But that was too wild even for us. So we had to cheat and go with "eXclamation points" fabric.
The border is also made of one square for each of the 26 letters (plus the 4 corner ABC squares).

The back fabric is a riot of ABCs on black. Due to the width of the quilt, I decided to piece the back. What better way to do it than to have a strip of all 26 letters running down the middle (with some alternate appropriate fabrics)!
The final two squares were reserved for the baby's name and birthdate. I rejected having them embroidered on; didn't think it would work well in such a small space. Thought about tracing the info onto fabric and then fusing on, but finally decided to find a fun font (went with one called Curlz MT), reverse printed it onto "Print-n-Press" (what I use for my morsbags labels) and then ironed them on. Perfect! (if I do say so myself.)

Hope you love it Eliza Page! Learn those ABCs!!!!!!!

Tuesday, May 1, 2012

Play Time

My friend Mari's family keeps having babies! This means she is one of my best customers. This bright, fun quilt is for new grand-nephew Max.
This is the seventh baby quilt, and tenth overall for Mari and husband Dennis.

Have fun, Max!!!!!!

Wednesday, March 28, 2012

Antipodes


This pattern has been in my "want to do" queue for a while, and this seemed like a good time to do it.

The name "Antipodes" means "places diametrically opposite to each other on the globe." To me, this pattern has that same look. Indeed, by following the instructions in the pattern (from Toad-U-Sew Patterns), each pieced square is then re-cut and resewn so that it forms two oppositely-hued squares.

Does it look like a reflection? Or rain? Or a waterfall? What would you call it?

This beautiful quilt has found a home in Houston, Texas!

NOTE: This quilt, along with a number of my other quilts, will be on display during the month of May in the Patty Turner Senior Center in Deerfield. If you're in the neighborhood, stop in and see them in person!

Tuesday, February 21, 2012

Andrew and Julie's Chuppah!


February 18, 2012 - Andrew and Julie's Wedding Day!!!!!!!

The chuppah typically consists of a square cloth made of silk, wool, velvet or cotton. For this special event, they asked me to make them a quilted chuppah.


A chuppah is a Jewish wedding canopy with four open sides. The wedding ceremony occurs under the chuppah.

The chuppah is then supported by four poles. For ours, I designed the framed structure and Andrew constucted it with help from Julie's aunt and uncle.

The chuppah symbolizes the new home that the couple will create. The ancient rabbis compared the chuppah to the tent of Abraham, found in a biblical story. Abraham was famed for his hospitality; his tent had entrances on all four sides so that travelers coming from any direction would have a door to enter.

Andrew and Julie took their vows under this chuppah in a beautiful interfaith ceremony led by Father Ed and Rabbi Ben.

The cloth will now hang in their new home (the one with walls). The frame was donated to Rabbi Ben for use by other couples.

Wednesday, February 8, 2012

Fine Finned Friends


As I mentioned in my January 19th post ("Sweet Dreams"), our friend Laura is about to become a grandmother....twice! So this is the second quilt I made for her.
The order for this one was "something colorful with fish". Voila! Here it is. And the back fabric is uber-cutesy too!!

Thursday, January 19, 2012

Four Patch Runner


After using the Bento Box runner as the pattern in my Beginning Quilting for the last several years I have decided it is time for a change. Had to find another pattern that was easy, and teachable in the class time, but that also had all the elements of a larger quilt. So here it is, the Four Patch runner. My next class is in March. Check it out at District 113 online.

Sweet Dreams


Good friend Laura is about to become a grandmother....twice! Her son and stepdaughter are both due in February. So this is the first of two quilts for her / them.
The order for this one was "something sophisticated, with simple blocks". I think this fills the bill. Don't you just want to snuggle up with it and take a nap!

Tuesday, January 3, 2012

Take Me Out To The Ball Game


Anyone who knows me even casually knows that two of my great passions are quilting and baseball. So it is really amazing that, after 17 years and 100+ quilts, this is my first baseball quilt!

One of my quilt blog fans, Janice, wanted me to make a baseball themed lap quilt for her husband for a Christmas gift. She told me that he is a big San Francisco Giants fan.

I began looking for baseball fabric, including something with the Giants logo. Well....believe it or not, even after winning the World Series in 2010, the Giants are one of the few teams in any major sport and most large universities that does not have authorized cotton fabric! So I had to use other baseball-themed fabs including green grass!).

While looking for a pattern, I happened across a site called Quilt Patterns From Seattle. They had a pattern called Military Nine Patch. Oddly enough, the example quilt shown on the site also contained baseball-themed fabrics!! I contacted the owner (Cindy Carter) to buy the pattern and let her know of my planned quilt. She was excited and asked for pictures when I completed it. I sent them, and she posted them on her site! So if you click on the link above, you can scroll down and see my quilt there, too.

Now, you may be thinking: quilts (winter) and baseball (summer) don't really go together. But if you've ever been to a game at Candlestick or PacBall / AT&T you will know that one thin lap quilt is NOT nearly enough to keep you warm!!!

Play Ball!!!!!!!

Sunday, December 18, 2011

Scrap Lap

A simple lap quilt, made from scraps, at the request of my mother-in-law, Pauline. Click here for more pictures.


But wait! This quilt contains a 3-part mystery...hidden in plain sight.
First: What is the nature of the mystery?
Second: What does it mean?
Third: Why does it have that meaning.

Anyone should be able to figure out the first two parts of the mystery; only family members will be able to answer the third question (hint, hint!).

Please submit your entries to my email address (wsrhodes@gmail.com) - not as a comment on this post - by midnight December 31st.

I will pick two winners (one for questions 1 and 2, one for #3) at random from the thousands of correct entries. Each winner will receive a morsbag! I will also post the answers.

This four-patch pattern will also be used in my next beginners classes this spring (without the mystery component!). If you are interested in attending, drop me a line.

Da-da-da-da-da-dee-da!!!!! The answer to the mystery:

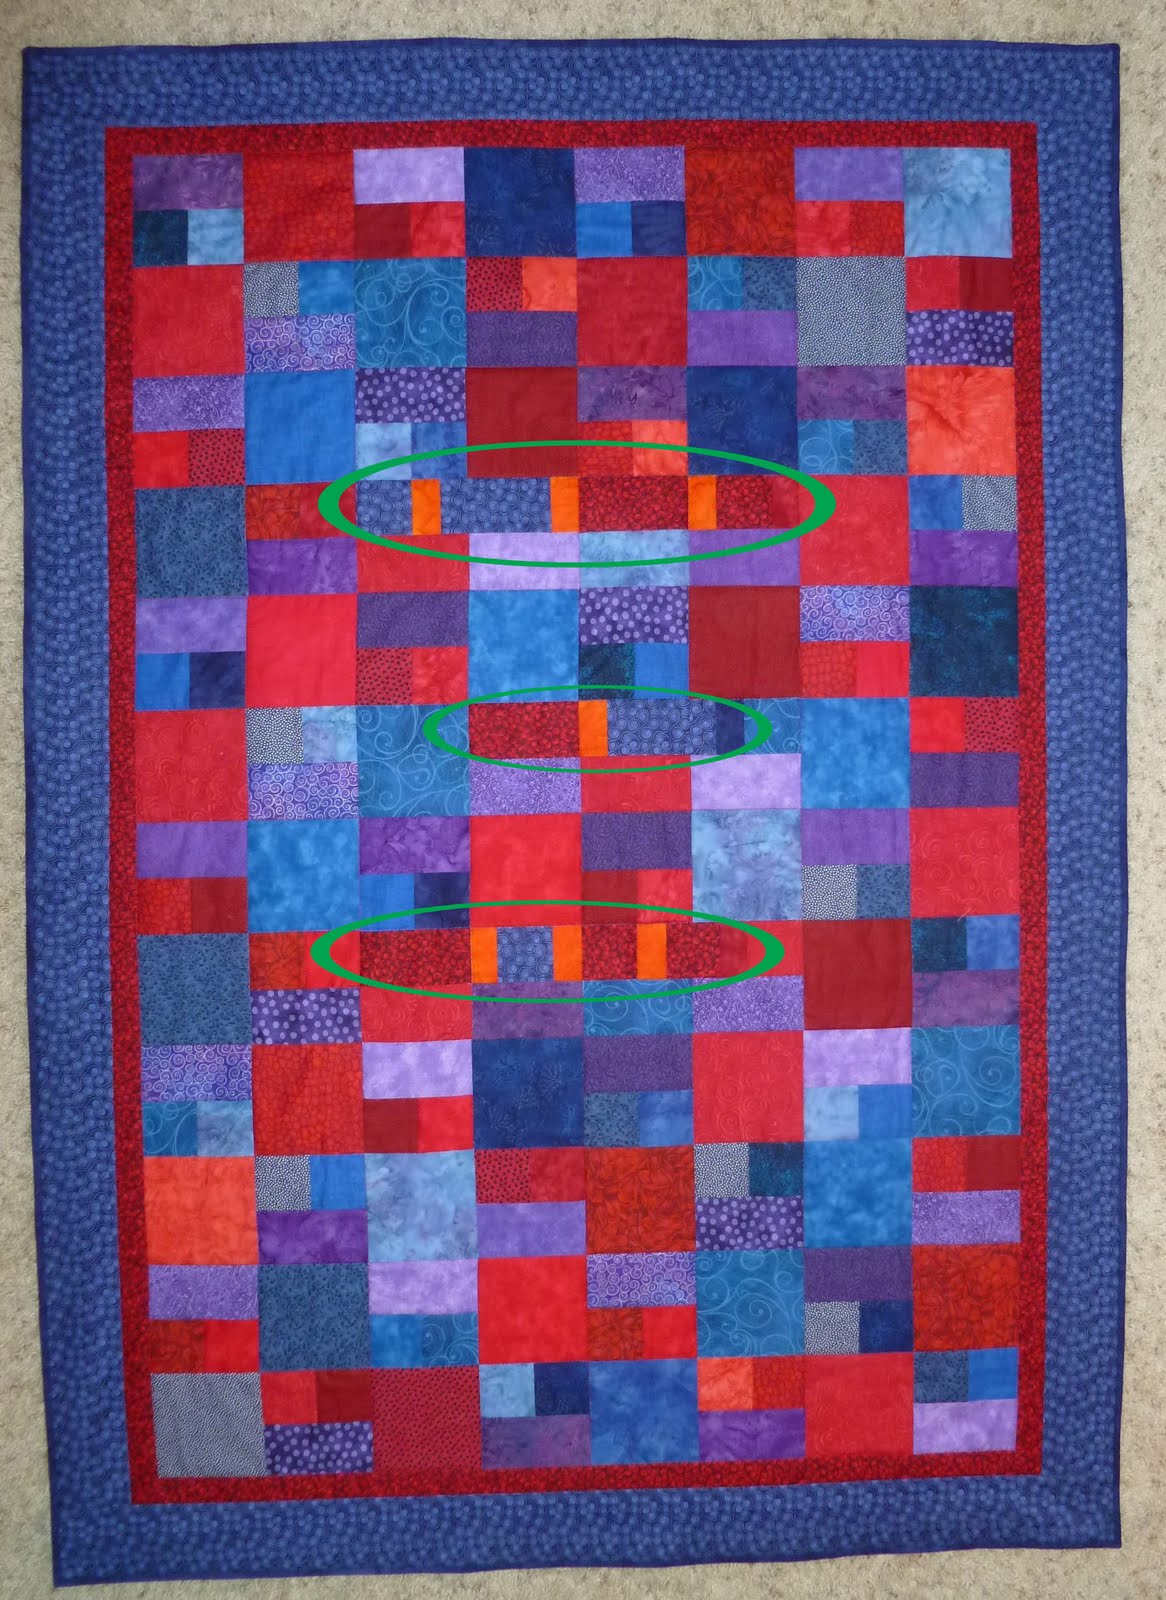
As indicated in the quilt's name, this is a scrap quilt. That means that all of the pieces were taken from fabric used in other quilts. The color palette was red and blue and purple. The various fabrics are used randomly throughout the 4-patch blocks. However, in the 3 highlighted rows there are some odd-looking smaller orange pieces. See them? Why are they there? Those orange pieces are the separators for the red and blue pieces that make up the mystery message. You will notice (if you look closely) that the red and blue fabrics adjoining those orange fabrics are used nowhere else in the quilt (except, as a subliminal reinforcement, in the inner and outer borders).

Notice the relative sizes of those red and blue pieces. If we "translate" them to words they would be:
square (orange separator) rectangle (separator) rectangle (separator) square
rectangle (separator) rectangle
rectangle (separator) square (separator) square (separator) square

By now, you may have deduced that this is Morse Code (part 1 of the mystery).

In more common terminology then, the message is:
dot (space) dash (space) dash (space) dot
dash (space) dash
dash (space) dot (space) dot (space) dot

Decoded, this becomes: P M B. So the quilt contains my mother-in-law's initials. (part 2 of the mystery).

But in the third part of the mystery I asked why it has this meaning?

Here is the answer: At Thanksgiving in 1995 Pauline happened to mention that she had no middle name. Her parents never gave her one when she was born. And she had always felt bad about that, as if she was missing something. So, unbeknownst to her, her 9 grandchildren (at that time) decided to rectify this gross omission. They got together and discussed some possibilities, and reached a consensus.

And on January 29, 1996, her 64th birthday, they happily presented her with their gift - a middle name. On that day she was finally christened: Pauline Margaret Baron.

And now you know the rest of the story!

Winners: um....no one got the answer. Only Pauline guessed that it was Morse Code, but could not decipher it. So the morsbags will go back in the prize closet until next time.


UPDATE: 1/31/22
Pauline asked if I could turn the lap quilt into a bed cover, by adding 24" to the width and 32" to the length.  Doing so would make the new size about 61" x 84".

We found two fabric prints: one with swirls and one with stars. The red on the front and blue on the back have the swirls; the purple and yellow have the stars.  The new binding is purple Dimples.

So how to add?  I first considered adding them using my Quilt in Sections technique. But that would have added some extra fabric on the back (for the fold-over-sew-down part). Instead, I chose to do another modification of the quilt-as-you-go method. 
The first step was to slice off the old binding (and, yes, the 1/4" of fabric underneath). Then I sewed the two left side front fabs together and attached them to the raw edge on the left front. I repeated on the right side. Then I did the same for the top and bottom fabs on the front. 
Next, I repeated that process for the fabs on the back. At that point I had the full expanded quilt.....but no batting in the new sections. So I cut batting to fit the left and right sides, and slipped those pieces in. I then quilted 4 evenly spaced lines from top to bottom using clear monofilament thread. Lastly, I repeated the same for the top and bottom: cut batting to fit, slipped them in, and quilted with 4 parallel going across. 

Expando-quilt!!!!  


In situ:


Tuesday, November 1, 2011

Look What's Outside My Windows! #2

The second time I have used this pattern (see April entry). This one is for a friend of my sister-in-law, and has a different set of whimsical animals.

Here's the front....

...and the back.

Sunday, September 4, 2011

Baby Elephant Walk

Our friends Mardelle and Jim just had a new grandson, Cameron. His parents, Lauren and Mike, requested an elephant themed quilt. We found these great elephant fabrics, but couldn't decide which to use. Solution? A 2-sided quilt!

Side 1:
Side 2:
Cameron joins sister Grace, who is still enjoying her Rain Forest quilt.

Wednesday, August 24, 2011

It's A Blue World, Max


Aunt Max loves blue (and so do I), so she asked me to make a quilt for her bed. The pattern has some similarities to Storm at Sea, since there are only straight cuts, but the angles make them appear to be circles. I designed this one so that the circles seem to overlap.

The quilt is 79x86 (double bed size). Each square is 6.5" (6" finished). It is actually paper-pieced, but I used 3 templates to cut the pieces to save wasted fabric. So each square is made of 2 halves (on a slight diagonal). Each half has 6 pieces made up of a combination of the 3 template shapes.

This quilt is special not only because it is for Aunt Max, but it also happens to be my 100th quilt!

And, here is another contest: What is the origin of the name of this quilt? If you know it (that means you may NOT look on the internet), please comment here or email me. I will pick randomly from all correct entries sent by midnight (Central) August 27th. Of course, the winner gets a morsbag!!!

Here is the answer: It is based on a line in the 1968 animated Beatles movie "Yellow Submarine". If you're too young to remember or have never seen it, it is a really fun movie. And the winner: My son Andrew!!! He knew the source. Second place goes to my daughter Emily (she knew it had something to do with the Beatles). They are the only two who came even remotely close. And no, this was not rigged!

Thursday, May 26, 2011

Sweetie Pie II

I did the original Sweetie Pie in July, 2010. My friend Mari loved it so much she asked me to make another one for new niece Skyler!


This is the sixth baby quilt, and ninth overall for Mari and husband Dennis.