Quilters Lead Pieceful Lives.

Thursday, May 26, 2011

Sweetie Pie II

I did the original Sweetie Pie in July, 2010. My friend Mari loved it so much she asked me to make another one for new niece Skyler!


This is the sixth baby quilt, and ninth overall for Mari and husband Dennis.

Wednesday, May 11, 2011

Reflections (aka Visualize Whirled Peas)


Talk about pushing the envelope! This quilt goes in so many new directions (pun intended!).

First: the design. This particular pattern, and the 3D scrolls technique, come from "3-D Explosion...Simply FABULOUS Art Quilt Illusions" by Cara Gulati. In this book, Cara explains how to start with a simple "S" shape and add perspective lines to make a scroll. Adding and/or repeating scrolls builds the design. Appropriate use of colors and patterns (especially the stripes) enhances the 3D effect. Sharp-eyed readers will notice that the primary striped fabric is the same one I used in my previous quilt (the attic windows). All of the rest came from my stash!

Next: There is no piecing involved! That's right! Until I got to the quilting phase, I never went near my sewing machine. Cara builds her designs using a combination of freezer paper, glue stick, and machine applique using invisible thread. Since I really don't like to do applique, I took a slightly different approach.

Background: In March I visited the Visions Art Museum in San Diego. There I purchased the book "free expression...the art and confessions of a contemporary quilter" by Robbi Joy Elkow. For Robbi, it's all about the designs, the colors, and the quilting. She definitely does not like to sew hundreds of pieces together. Once she has the design, she cuts the distinct pieces to make templates (exactly like Cara does), but then she use fusible webbing to fuse the pieces together. No stitching! No applique! Then, heavy quilting. Her reasoning is that these pieces are meant to be hung, so there is no need to worry about the raw edges.

As I contemplated making one of Cara's quilts, I realized that I could use the fusing (and other techniques) from Robbi's book! So I was able to take the best of both approaches to create this quilt.

Now, most of you probably know that I consider quilting to be the least important design element of my quilts. It is almost entirely functional (to hold the quilt sandwich together), and I almost always use thread colors to match the fabrics so that the quilting is basically invisible. These 3D patterns are perfect for that mentality! Once again, here I followed Robbi's advice and quilted each piece in a way that mimicked the shape of that piece. So the quilting is both semi-invisible and highlights / reinforces the scrolls at the same time! And it is critical that the quilting go to the edges of the pieces (a faux applique!) so that they are tacked down thoroughly. Though I do a lot of free-motion quilting, as I was doing this piece, I felt for the first time that I was actually "painting" with the thread!

The final oddity: At the Visions Art Museum I saw a number of art quilts that were mounted on wooden stretcher bars (just as a painting on canvas would be). How perfect for this piece and any of Cara's 3D designs. These works are like canvases and the designs are meant to pop off the background. I am always a bit dismayed when my quilts do not hang straight and flat on the wall. The stretchers also solve this problem. And, since the piece is stretched around the bars, there is no need for a border nor a binding!

To see more pictures which go through the entire process of making this quilt, click here

Wednesday, April 27, 2011

Look What's Outside My Windows!

For Lydia! Cute snails and mushrooms outside your "windows"!


This is the fifth baby quilt (nieces and nephews), and eighth quilt overall for my friend Mari.

Unusual in this one is that the border threads are variegated on the top (to blend with the striped border), and pink on the back (to blend there).

Monday, April 25, 2011

Wondrous Waves

Got a commission to make a queen-size bed quilt. The charge was to make something colorful that was reminiscent of flowers and nature. Originally we were going to do something like "Shana's Choice". But when we got to Quilter's Heaven we saw a different pattern, "Eureka" by Maple Island Quilts. Though the pattern is for a lap quilt, we decided this was the one! So I scaled it up, we picked wonderful fabrics, and here is the result:


Since it was so big, I pieced and quilted it in quarters. The quilting was done in the ditch (just along the long edges) with clear monofilament thread. Thus it is practically invisible. Then the quarters were joined.

Monday, February 21, 2011

Sari Safari


Last December we traveled to India. It was a fantastic experience! We saw many amazing things, ate lots of delicious food, and met many wonderful people. We also had the opportunity to ride an elephant and a camel.

As I did in Japan and Thailand, I was fortunate to be able to purchase some locally made fabrics. Some were at a store in Jaipur, the rest came from the "Ganesh Handicraft" store in Udaipur (thanks, Mona!). What an amazing place! The walls were covered with quilts of every size, color and pattern. Here are some of them:


So I took these as my inspiration to make a quilt that captured the essence of India as well as our personal experience there. Thus the camels and elephants!

The fabrics I purchased were cotton and a very coarse, open-weave raw silk (I really only wanted cotton, but Ganesh only carried the silk). The silk has a beautiful sheen to it, but it was very difficult to work with. Had I known that up front, I might not have made the paper-pieced animals.

I ditch quilted it using gold metallic thread. This is the same type of thread that is in the red medallion fabric, and it also reinforces the sheen of the silk.

Click to see other views.

And, to see our India photo album click here. It is best if you do "slide show", "full screen", "one page at a time". Then you can read the captions better.

Saturday, February 5, 2011

Through A Glass Darkly


This is a very unusual quilt for a number of reasons:

First, the idea. It came from a picture of a rug (below) that I noticed in a magazine while we were in Healdsburg, California for my mom’s and sister’s birthday party in 2005. I liked the playful, condensed block of colors against the larger, dark background.


Next, the design. Obviously, the quilt could not be anywhere near as large as an actual area rug. I figured that about 40” x 60” would work. So there had to be enough repeats in the center medallion to produce the intended affect, but overall it had to be small enough to allow for a large background and border and still fit into the desired size. Additionally, the colored rectangular mini-blocks had to be designed so that each had a slight tilt. Then, there are the smaller square blocks in the alternating rows, and a thin sashing strip that separates them (the vertical sashing is incorporated into the mini-blocks). The fabric for the main background is actually black with some dark blue highlights (hard to see, but they really are there). This was done to add some interest and avoid a dull, flat looking expanse without directly moving the focus from the center. The goal was to make the medallion “pop” both visually - through the colors-on-black, and physically - because it is actually floating above the background’s surface!

Then, the execution. This is the most unusual aspect of this piece. It is actually a quilt on a quilt! First, the medallion: The mini-blocks were pieced and cut as regular rectangles. Then I used a template at an angle to create the tilt. And, in a very rare approach (for me at least), I pressed the seams open. This was done to avoid extra bulk in the mini-blocks and also to minimize the visibility of the seam lines. The blocks were then assembled into rows and joined to the sashing and the square-block rows. The medallion was then made into a sandwich with batting and a piece of muslin. The top, bottom, and side sashings were intentionally left large so that they could be folded to the back and whipstitched in place. Then the entire piece was set aside.

I did not want any seams to mar the expanse of the background, so it was cut from one single piece of fabric. The borders, batting, and back were added as if this were a regular quilt top. I then stiple quilted in wavy black lines to mimic and reinforce the back-and-forth motion of the mini-blocks. The binding and sleeve finished off this part of the project.

The medallion set was then centered and ditch quilted on top of the larger quilt.

Finally, the name. Once again, I am at a loss for what to call this piece. So I am calling on everyone to be creative and come up with an appropriate (and unusual?) name. Submit as many entries as you want (along with an explanation if necessary). The winner will get a morsbag in the color of their choice.

And what’s not unusual about this quilt? It will hang in Pauline’s apartment of course!

Sunday, January 16, 2011

Bill's Choice

A few month's ago I made a wall-hanging for my friend Shana. Her friend Bill saw it and liked it so much that he asked for a similar piece in shades of blue. Thus was born "Bill's Choice"!

Monday, January 3, 2011

Seussical the Quiltical

My daughter Emily's friends Melanie and Ken were expecting their first child in late September. She suggested we make a quilt for them. Melanie is a BIG Dr. Seuss fan, so we looked for some Dr. Seuss fabric and found what you see below (there were more fabs to choose from but we narrowed it down to these 8). Then we had to come up with a pattern. We decided that a 9-patch would be good, but couldn't find a way to use all the fabrics.

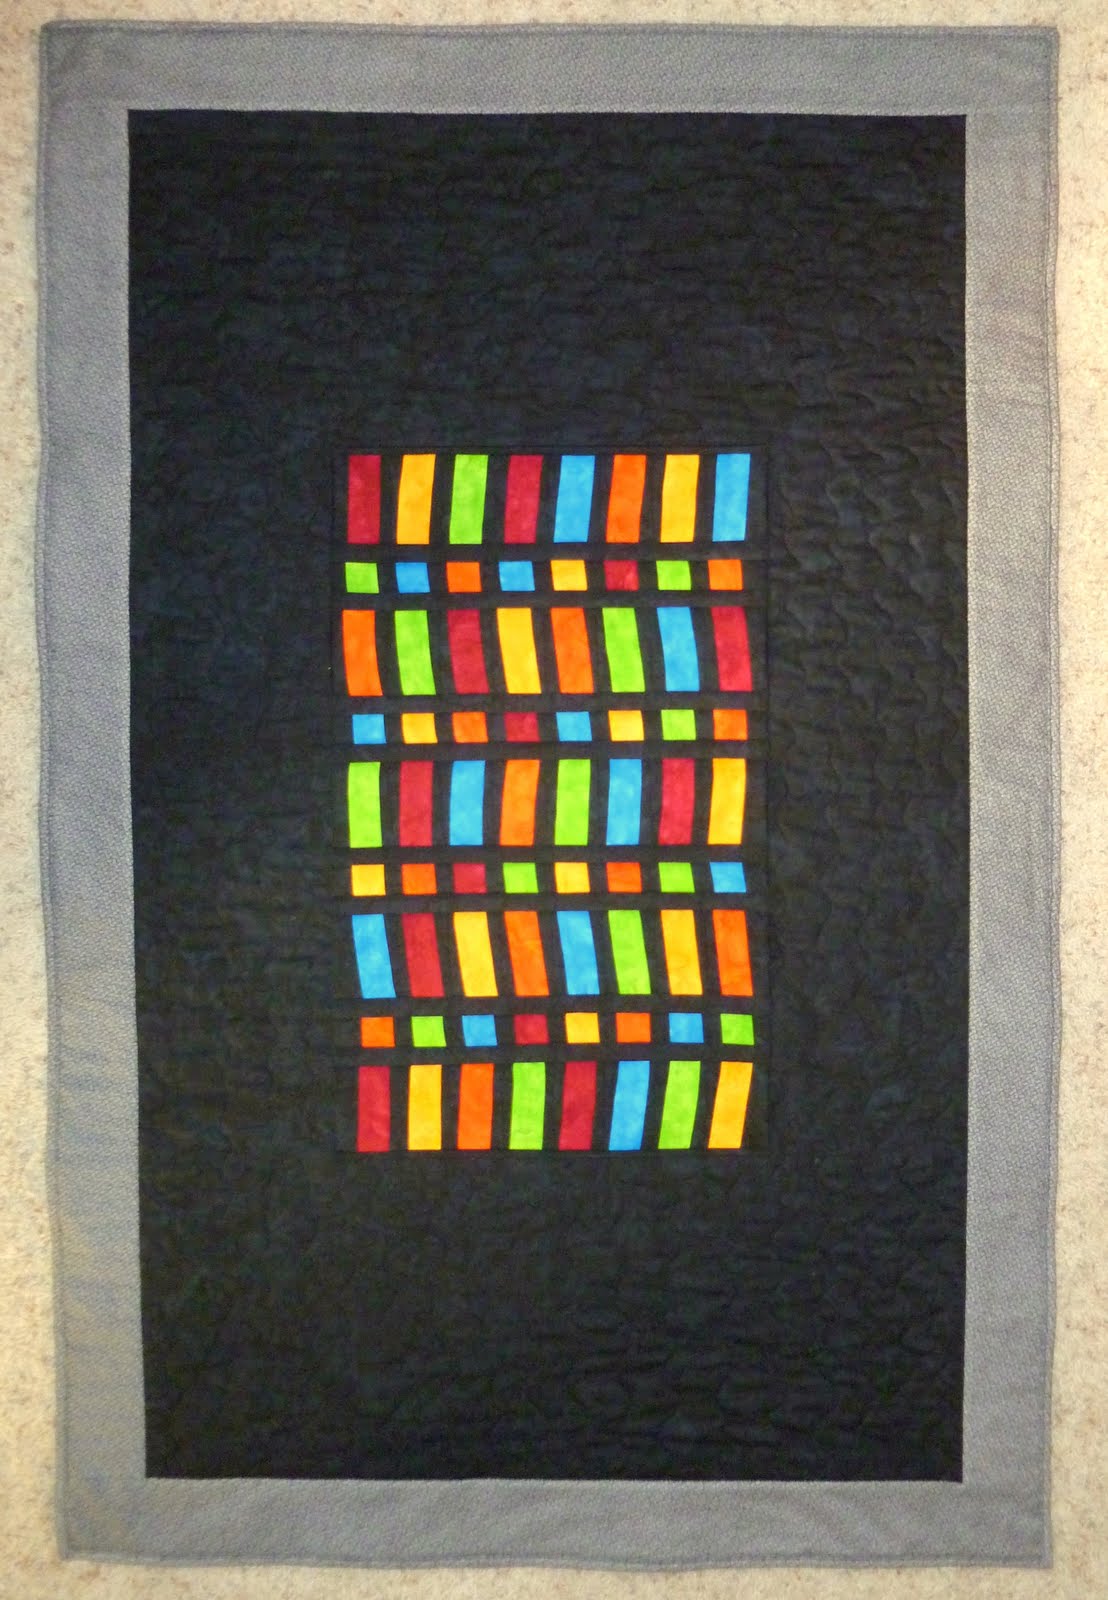
Em then suggested that we do something on the back instead of the usual "one piece of fabric".
We eventually came up with this:

So the quilt really has two "front" sides and no "back"!
Em did most of the cutting and stitching. I did the quilting and the binding.
Melanie did her part and baby Avery was born on September 30th.

Emily gave the quilt to Mel and Ken and Avery when she visited NOLA last week. It was a big hit!
Check out more pix!

Monday, November 22, 2010

Remembering Ken

In August, after a long battle with cancer, my wife’s Uncle Ken passed away. Ken was a fascinating person and a collector par excellence of a wide variety of objects. One of these was his collection of neckties. So Aunt Max asked if I would create a quilt using them. All quilts are special, but this one is truly unique. Even the fabric composition is unique (for me) as it is comprised of cotton, flannel, polyester, and silk! Using the ties as a starting point, I tried to capture Ken’s essence.

Ken’s main passion was movies. He had a large collection of vintage films, projectors, posters, and other paraphernalia. Related to Ken’s love of movies (especially serials) is the fact that he was also an author: (see "To Be Continued" and "To The Rescue"). Thus, I included a fabric with images from classic horror movies. (This fabric is also the back of the quilt.)

He was also a professor of communications at Iona College in New York. So there are some squares devoted to teaching / school.

At one time, Ken and Max owned and ran Shire Village Camp in the Berkshires of Massachusetts. Hence the camp-related fabric.

Finally, Ken loved music, and, of course, his taste was eclectic. He loved classic music from the 30s and 40s, but he also liked the rock-n-roll of the 60s and 70s. Every Sunday he listened to Jonathan Schwartz on public radio. So I included the fabric with the musical notes.

All of these theme fabrics are surrounded by squares cut from Ken’s ties.

With this quilt as a symbol, we will always remember Ken.

Wednesday, October 20, 2010

Shana's Choice

This quilt was made for our good friend Shana Lowitz. Shana comes from a very artistically gifted family. She asked me to design a wall quilt that had visual interest, but was not too busy; one that had some structure, but also some randomness; in soft rusts, corals, greens, and browns.

The pattern is loosely based on one from the book "City Quilts" by Cherri House.

Though the quilt is relatively small (about 38" x 26"), it is made up of 20 different fabrics. And no matter how closely you look, you won't see any quilting. Why? There are 7 rows, each comprised of a number of "block" units. Each row was then sewed to the previous row directly onto the batting/backing in the "quilt as you go" fashion (the same as I used for the small handbags I made a few years ago). Thus, no visible quilting on the front and only 7 straight lines on the back!

As Shana and I were designing it, we tried to come up with an appropriate name. Alas! We were unable find one worthy enough. So, once again, I am opening up naming rights to everyone. Please submit your choice either by commenting directly on the blog or by emailing me. Shana will have the honor of picking the winning name from all of the entries. The winner's name will be posted and he/she will receive a morsbag in the color of their choice.

Update: There were 17 entries in the "Name the Quilt" contest. As you can see, Shana chose "Shana's Choice", which indeed it was! The winning entry was submitted by Pauline (who knows a thing or two about quilts!). Thanks to all who submitted.

Friday, September 24, 2010

This Makes Me Happy!

A multi-colored bedspread made especially for my biggest fan (in terms of the number of my quilts she has, among other things), my mother-in-law Pauline. Though it looks like a scrap quilt, we actually picked and purchased 30 different fabrics specifically for this project. Even so, when we laid out the pieces to arrange it, we had to include one piece from my stash to fill in the last spot. You'll have to visit Pauline's apartment to try to find it!

I did minimal shadow quilting using a clear monofilament thread. That way the quilt stitches are nearly invisible, letting all of the bright colors show through.

And the name of the quilt? It is Pauline's suggestion. Perfect, no?
Click to see other views.

Tuesday, August 24, 2010

Two Alef-Bet Quilts

Last spring, by coincidence, I learned of two soon-to-be new little people.

One was the first child of our religious school director and his rabbi wife.

The other was the fifth child of the daughter of friends of ours. The daughter and her family live in Israel.

When I offered to make a quilt for each family, both suggested a Jewish theme. So I began looking for suitable patterns.

Then I found this Hebrew alphabet (or, more correctly, alef-bet) pattern.

I don't normally like to make the same quilt twice, but this opportunity was too good to pass up.

I used the same fabrics in both, but slightly changed which colors went with which letters. Each block is paper-pieced.


Remember that Hebrew is read from right to left, so the letters are: alef, bet, gimel, hei, vav, zayin, chet, tet, yud, kaf, lamed, mem, nun, samech, ayin, peh, tzaddi, kuf, resh, shin, and tav. There are also 5 "final consonants" (versions of other letters) in the alef-bet. These were not included. Nor were the vowel symbols, which go below the letters.

There are two other symbols (in the bottom row). The one on the right is the Star of David (or Jewish Star). In Hebrew it is called the Magen David which means "shield of David". There are many ideas about the symbolic meaning of the Star of David. Some Kabbalists thought that the six points represented God's absolute rule over the universe in all six directions: north, south, east, west, up and down. They also believed that the triangles represented humanity’s dual nature – good and evil – and that the star could be used as protection against evil spirits.

The structure of the star, with two overlapping triangles, has also been thought to represent the relationship between God and the Jewish people. The star that points up symbolizes God and the star that points down represents us here on earth. Yet others have noticed that there are twelve sides on the triangle, perhaps representing the Twelve Tribes.


The other symbol is the hamesh (meaning "hand" in Hebrew; also hamsa in Arabic). It is an old and still popular amulet for magical protection from the envious or evil eye. The words hamsa and hamesh mean "five" and refer to the digits on the hand. An alternative Islamic name for this charm is the Hand of Fatima, in reference to the daughter of Mohammed. An alternative Jewish name for it is the Hand of Miriam, in reference to the sister of Moses and Aaron.

Tuesday, July 20, 2010

Batik Coins

This is a pattern commonly called "Chinese Coins" because the solid blocks are said to look like stacks of coins. I guess if you squint and tip your head sideways you could come to that conclusion. Anyway, this is a very simple pattern, and I made it to use as the project for my next quilt class in September.

Friday, July 9, 2010

Sweetie Pie

Cute little creepy-crawlies, flowers, butterflies, balloons, and oh-so-sweet pink and yellow with pindots!
The 9-patch squares are worked into the border, and.....
repeated on the back.

Wednesday, April 28, 2010

Flight of Fancy

I really went out of the box (for me!) with this quilt:


First, by fussy cutting and arranging the theme fabric (bird / flowers / Japanese-style motifs), it is almost a realistic landscape scene. My work is usually much more geometric.

Second, it is done using a combination of piecing styles: It is a 9-patch, but also includes both big and small solid patches of the theme fabric. Usually, a quilt is made using just one type of piecing technique.

Third, in order to smoothly incorporate the 9-patch squares into the theme fabric, I used the watercolor approach. That is, adjoining squares and patches blend together to appear as a smooth transition.

Finally, it is quilted using several different design elements (what was I thinking!). The orange setting points were shadow quilted. The large and small bird squares were free-form quilted with arcs to represent the shape of the birds' wings, the clouds, and also to reflect the curved motifs. The 9-patches and adjoing squares were ditch quilted, but only in parallel lines from bottom right to upper left to help reinforce the flight path of the birds.

One other note (which you quilters will certainly appreciate): When I took the pattern (from 9-Patch Pizzazz by Judy Sisneros) into the quilt store to buy fabric, we pulled an interesting bolt off the shelf and started building around it. After a few minutes we realized that it was the same fabric that was used in the pattern! Believe me, this never happens in real life!!!!

For sale: 38" x 47"  wall hanging  $150